How to validate child component from parent component on click button using aura method in lightning component

Hey guys, today in this post we are going to learn about how to validate child component from parent component on click button using aura method in Salesforce lightning component.
Files we used in this post example:-
eventApp.appLightning ApplicationIt is used for call the component to preview on browser.
eventCmp.cmp
Lightning ComponentIt is parent component of “eventValidationCmp.cmp”.
eventCmpController.js
Lightning Component ControllerIt is used for click functionality that gets the value from child component to aura method.eventValidationCmp.cmpLightning ComponentIt is a child component of “eventCmp.cmp” and hold aura method attribute with action method.eventValidationCmpController.jsLightning Component ControllerIt is used for display validation error messages in lightning component.eventValidationCmp.cssComponent Style CSSIt is used for create custom stylish form validation error message.
Real time scenarios:- Create a custom and stylish form validation and validate child component from parent component using aura method in lightning component.
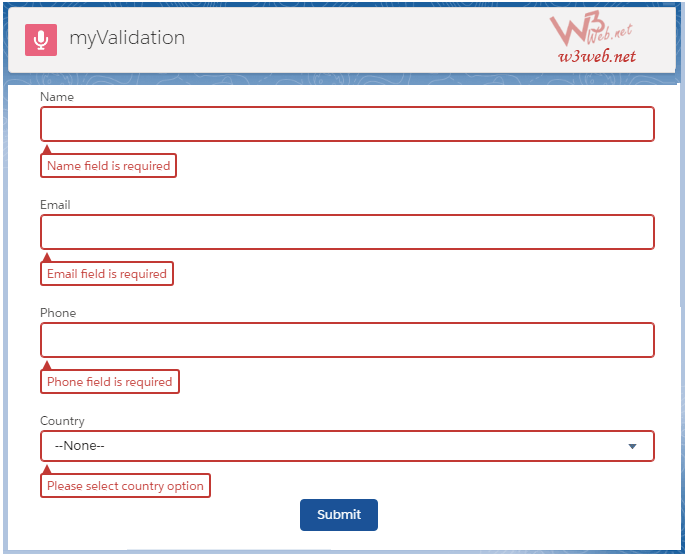
Final Output

Step 1:- Create Lightning Application : eventApp.app
From Developer Console >> File >> New >> Lightning Application : eventApp.app
eventApp.app [Component Application File]
<aura:application extends=”force:slds”>
<c:eventCmp/>
</aura:application>
Step 2:- Create Lightning Component : eventCmp.cmp
From Developer Console >> File >> New >> Lightning Component
eventCmp.cmp [Lightning Component File]
<aura:component implements=”force:appHostable,flexipage:availableForAllPageTypes,flexipage:availableForRecordHome,force:hasRecordId,forceCommunity:availableForAllPageTypes,force:lightningQuickAction” access=”global”>
<c:eventValidationCmp aura:id=”getEventId”/>
<div class=”slds-grid slds-wrap”>
<div class=”slds-text-align — center slds-col slds-size_6-of-12 slds-m-bottom — medium”>
<button class=”slds-button slds-button — brand” onclick=”{!c.eventValidation}”>Submit</button>
</div>
</div>
</aura:component>
Step 3:- Create Lightning Component : eventCmpController.js
From Developer Console >> File >> New >> Lightning Component >> JavaScript Controller
eventCmpController.j [JavaScript Controller]
({
eventValidation : function(component, event, helper) {
var firstNameId1 = component.find(‘firstNameId’);
component.find(‘getEventId’).validationDR(firstNameId1);
},
})
Step 4:- Create Lightning Component : eventValidationCmp.cmp
From Developer Console >> File >> New >> Lightning Component
eventValidationCmp.cmp [Lightning Component File]
<aura:component implements=”force:appHostable,flexipage:availableForAllPageTypes,flexipage:availableForRecordHome,force:hasRecordId,forceCommunity:availableForAllPageTypes,force:lightningQuickAction” access=”global”>
<aura:attribute name=”fieldVal” type=”string”/>
<aura:method name=”validationDR” action=”{!c.eventInpValidation}”>
</aura:method>
<div class=”slds slds-p-horizontal — medium”>
<div class=”slds-grid slds-wrap”>
<div class=”slds-p-horizontal — medium slds-col slds-size_6-of-12 slds-m-bottom — medium”>
<div class=”slds-form-element”>
<label class=”slds-form-element__label”>Name</label>
<div class=”slds-form-element__control”>
<ui:inputText class=”slds-input” aura:id=”firstNameInp” value=””/>
</div>
</div>
</div>
</div>
<div class=”slds-grid slds-wrap”>
<div class=”slds-p-horizontal — medium slds-col slds-size_6-of-12 slds-m-bottom — medium”>
<div class=”slds-form-element”>
<label class=”slds-form-element__label”>Email</label>
<div class=”slds-form-element__controller”>
<ui:inputEmail class=”slds-input” value=”” aura:id=”emailId”/>
</div>
</div>
</div>
</div>
<div class=”slds-grid slds-wrap”>
<div class=”slds-p-horizontal — medium slds-col slds-size_6-of-12 slds-m-bottom — medium”>
<div class=”slds-form-element”>
<label class=”slds-form-element__label”>Phone</label>
<div class=”slds-form-element__controller”>
<ui:inputPhone class=”slds-input” value=”” aura:id=”phoneNo”/>
</div>
</div>
</div>
</div>
<div class=”slds-grid slds-wrap”>
<div class=”slds-p-horizontal — medium slds-col slds-size_6-of-12 slds-m-bottom — medium”>
<div class=”slds-form-element”>
<label class=”slds-form-element__label”>Country</label>
<div class=”slds-form-element__controller”>
<ui:inputSelect class=”slds-select” aura:id=”countryName” value=””>
<ui:inputSelectOption text=” — None — “/>
<ui:inputSelectOption text=”India”/>
<ui:inputSelectOption text=”Nepal”/>
<ui:inputSelectOption text=”Sir Lanka”/>
<ui:inputSelectOption text=”America”/>
</ui:inputSelect>
</div>
</div>
</div>
</div>
</div>
</aura:component>
Step 5:- Create Lightning Component : eventValidationCmpController.js
From Developer Console >> File >> New >> Lightning Component >> JavaScript Controller
eventValidationCmpController.js [JavaScript Controller]
({
eventInpValidation : function(component, event, helper) {
var isValidate = true;
var firstNameInp = component.find(‘firstNameInp’);
var firstNameVal= component.find(‘firstNameInp’).get(‘v.value’);
var emailIdInp = component.find(‘emailId’);
var emailIdVal= component.find(‘emailId’).get(‘v.value’);
var phoneNoInp = component.find(‘phoneNo’);
var phoneNoVal= component.find(‘phoneNo’).get(‘v.value’);
var countryName = component.find(‘countryName’);
var countryNameVal= component.find(‘countryName’).get(‘v.value’);
if($A.util.isUndefinedOrNull(firstNameVal) || $A.util.isUndefined(firstNameVal) || $A.util.isEmpty(firstNameVal)){
firstNameInp.set(“v.errors”,[{message:’Name field is required’}]);
isValidate = false;
}else{
firstNameInp.set(“v.errors”,null);
}
if($A.util.isUndefinedOrNull(emailIdVal) || $A.util.isUndefined(emailIdVal) || $A.util.isEmpty(emailIdVal)){
emailIdInp.set(“v.errors”,[{message:’Email field is required’}]);
isValidate = false;
}else{
emailIdInp.set(“v.errors”,null);
}
if($A.util.isUndefinedOrNull(phoneNoVal) || $A.util.isUndefined(phoneNoVal) || $A.util.isEmpty(phoneNoVal)){
phoneNoInp.set(“v.errors”,[{message:’Phone field is required’}]);
isValidate = false;
}else{
phoneNoInp.set(“v.errors”,null);
}
if(countryNameVal == ‘ — None — ‘){
countryName.set(“v.errors”,[{message:’Please select country option’}]);
isValidate = false;
}else{
countryName.set(“v.errors”,null);
}
if(isValidate){
alert(‘Form submitted successfully’);
/*
var toastEvent = $A.get(“e.force:showToast”);
toastEvent.setParams({
“title”:”Success”,
“type”:”success”,
“message”:”Form submitted successfully.”,
});
toastEvent.fire();
$A.get(‘e.force:refreshView’).fire();
*/
}
},
})
Step 6:- Create Lightning Component : eventValidationCmp.css
From Developer Console >> File >> New >> Lightning Component >> Component Style CSS
eventValidationCmp.css [Style CSS]
.THIS {
}
.THIS .slds-input.has-error, .THIS .slds-select.has-error {
background-color: rgb(255, 255, 255);
border-color: rgb(194, 57, 52);
box-shadow: rgb(194, 57, 52) 0 0 0 1px inset;
background-clip: padding-box;
}
.THIS .slds-input.has-error + ul.has-error, .THIS .slds-select.has-error + ul.has-error{border:2px #c23934 solid; border-radius: 3px;}
.THIS .slds-input.has-error + ul.has-error, .THIS .slds-select.has-error + ul.has-error{position:relative; margin:0 0 10px 0; padding:0; list-style:none; display: inline-flex; top:11px; left:0;}
.THIS ul.has-error li.form-element__help{margin:0; padding: 3px 5px; top:10px;}
.THIS ul.has-error li.form-element__help:before{content: ‘’; width: 0; height: 0; border-left: 5px solid transparent; border-bottom: 10px solid #c23934;
border-right: 5px solid transparent; position: absolute; left: 0px; top:-11px; }